There are various ways of changing the
brightness of an
image.Here we shall discuss the method using Curves command and screen
blend mode.This method is non destructive which means that it does not make any
changes to the image.


Before After
1) Opening the image in the Photoshop window
Open the image that is underexposed (means the one that
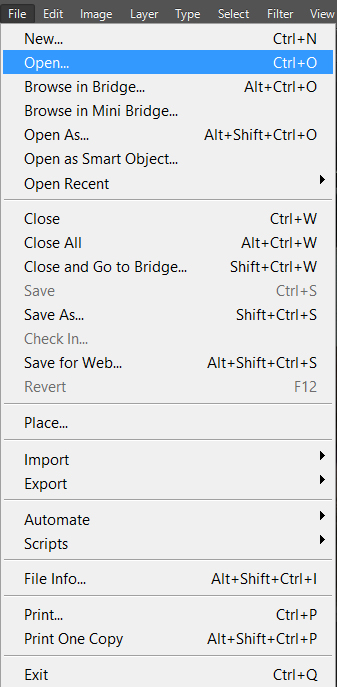
needs to be brightened) in Photoshop CS6 by using the menu File > Open or by using the keyboard shortcut Ctrl + O.This
will open a dialog box.Select the image by clicking on its name and click Open button.
2) Selecting the Curves option
After we see the image in Photoshop window we need to open the Curves
properties window.For this we need to select the Curves option.There are two ways of selecting the Curves option.
a) Select menu Layer > New Adjustment Layer > Curves...
b) The other way to get the Curves option is by
clicking on the Create new fill or adjustment layer icon (half colored circle) in the bottom of the
layers panel on the right side of the photoshop window and selecting Curves option.
3)Curves Properties panel
Now we can see a Curves Properties panel.We need not make any changes in the curves properties panel.We can click
on the double pointing arrow on the top right of the properties panel
to exit out of the properties panel.


4)Layers panel


4)Layers panel
We can see a new Curves adjustment layer with a half colored circle
added in the layers panel on the right side of the photoshop window.By default this layer is selected.
Now
we will change the blending mode of this layer from Normal to
Screen.For doing this we will click on the up-down pointing arrow in the
drop down box on top of the layers panel.By default we see the blending
mode set to Normal.As soon as we click on the drop down menu we see a
list of blending modes.We will select Screen and find that the image has
brightened a bit.If we are happy with the results we can save the
image following step 5.


b)Reducing the Opacity
If
the image has brightened up too much we need to reduce the Opacity of
the Curves adjustment layer.We can see the layer opacity values at the
top in the Layers panel right next to blending options.By default we see
the opacity set to 100%.When we click on the down pointing arrow we see
a slider which we can drag to the left or right to decrease or increase
the opacity values.Experiment with the opacity values to get the
desired brightness of the image.If we are happy with the results we can save the
image following step 5.
c)Duplicating the layerIf the image needs more brightening we need to duplicate the Curves layer in the layers panel.There are two ways to duplicate the layer .
First way is to use the keyboard shortcut Ctrl + J .This will place a copy of the curves layer exactly above the curves layer and name it as Curves 1 copy.It will also have screen blending mode .
Second way is to select the down pointing arrow on the top right corner of the Layers Panel and select Duplicate Layer...option.This will open up a Duplicate Layers dialog box asking us to enter a name for the duplicate layer.By default it will name it as Curves 1 copy.Click on OK button to exit out of the dialog box.
If the image seems to be too bright we can reduce the opacity of Curves 1 copy.
5)Saving the image


No comments:
Post a Comment