There are various ways of converting an image
from colored to Black and White.Here we shall discuss the method that
is non destructive which means that the
method does not make any changes to the image.Photoshop uses a
separate Photo Filter layer to apply the adjustments.
 Before After
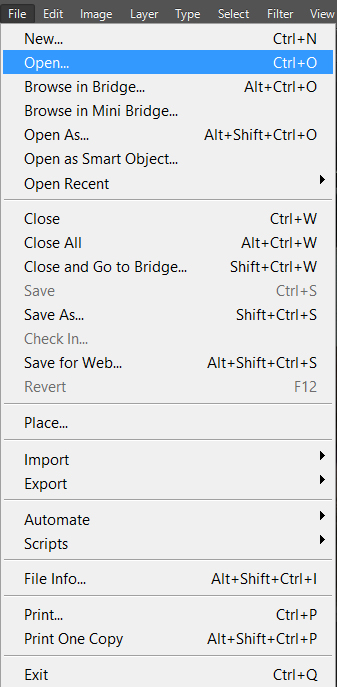
1) Opening the image in the Photoshop window
1) Opening the image in the Photoshop window
Open the colored image in Photoshop CS6 by using the menu File > Open or by using the keyboard shortcut Ctrl + O.This
will open a dialog box.Select the image by clicking on its name and click on Open button.

2)Selecting the Photo Filter... option
2)Selecting the Photo Filter... option
After
we see the image in Photoshop window we need to open the Photo Filter Properties Panel.For this we need to select the Photo Filter
option.There are two ways of selecting the Photo Filter option.
a) Select menu Layer > New Adjustment Layer > Photo Filter...


b) The other way to get the Photo Filter option is by clicking on the Create new fill or adjustment layer icon (half colored circle) in the bottom of the layers panel and selecting Photo Filter... option.

4) Photo Filter Properties panel
Now
we can see a Photo Filter Properties panel with a Color option.
a)We will click on the radio button in front of the Color option.

b)We will double click on the square box in front of the color option.We need to change the color in the square box to black.As soon as we double click on it we get a Color Picker Dialog box where we need to select black color.
c)In the Color Picker Dialog box we can enter the R ,G and B values as 0(zero).Alternatively we can enter 000000(six zeros) in the rectangle box at the bottom of R,G,B values.We will click on the OK button to exit out of the color picker dialog box.

d)Now we will drag the density slider in the Photo Filter properties panel towards the rightmost corner till the value reaches to 100%.

We can observe that the color of the image has become black and white.
e)To hide the Photo Filter Properties panel click on the double pointing arrow on the top right of the properties panel.To exit out of the Photo Filter Properties panel click on the cross mark on the top right corner of the properties panel or click on the down pointing arrow at the top right corner of the properties panel and select close.

a)We will click on the radio button in front of the Color option.
b)We will double click on the square box in front of the color option.We need to change the color in the square box to black.As soon as we double click on it we get a Color Picker Dialog box where we need to select black color.
c)In the Color Picker Dialog box we can enter the R ,G and B values as 0(zero).Alternatively we can enter 000000(six zeros) in the rectangle box at the bottom of R,G,B values.We will click on the OK button to exit out of the color picker dialog box.
d)Now we will drag the density slider in the Photo Filter properties panel towards the rightmost corner till the value reaches to 100%.
We can observe that the color of the image has become black and white.
e)To hide the Photo Filter Properties panel click on the double pointing arrow on the top right of the properties panel.To exit out of the Photo Filter Properties panel click on the cross mark on the top right corner of the properties panel or click on the down pointing arrow at the top right corner of the properties panel and select close.
We can see a new
layer with a thumbnail (camera with a small circle on top of it)added just above
the image layer in the layers panel on the right side of the photoshop
window.

6)Saving the image
After we are satisfied with the adjustments we will save the image by
selecting the menu File > Save or by using the keyboard shortcut Ctrl + S.This will open a dialog box where we
can write the name of the image.After typing a name click on Save
button.

The disadvantage of using this method is that we have no control over the adjustment.
No comments:
Post a Comment